
Emergent builds a real mobile app from a description in plain words. It also builds the Android file Google Play needs, so you never open Android Studio or a terminal. This guide covers the whole route in 8 steps: four in Emergent to make the file, and four in Google Play Console to make it public.
Shortcut Rather not read it all? Copy our AI prompt and your AI assistant walks you through every step.
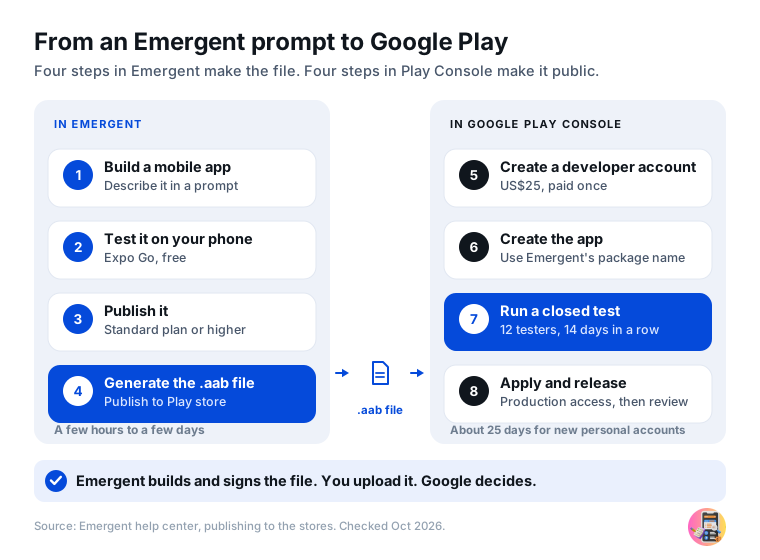
Get ready
Before you start
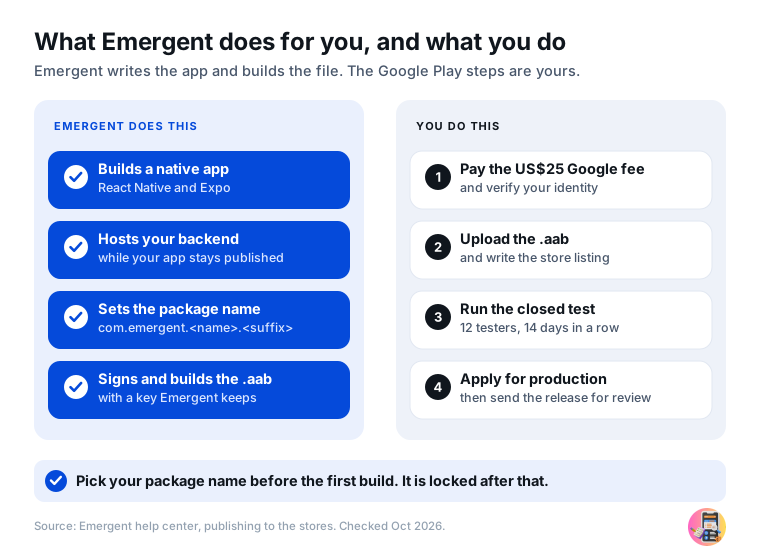
What Emergent does, and what you do
Emergent writes a native app with React Native and Expo, and hosts the server and database it talks to.
It sets the package name, creates the signing key and builds a signed .aab file. Uploading
that file, and everything after it, happens in Google Play Console.
Good to know
An Emergent mobile app is a native app. It is not a website in a wrapper and not a TWA (Trusted Web Activity), so Google Play treats it like any other Android app and you do not need to convert anything.
Have these ready
- An Emergent Standard planOr higher. US$20 a month, or US$17 a month billed yearly. The Free plan can build and preview an app, but it cannot publish it or make the Android file.
- Credits to keep the app publishedA published app costs from 50 credits a month. The Play version of your app needs it to stay published.
- A Google Play developer accountUS$25, paid once. Step 5 covers it.
- A privacy policy pageAt a public web address that opens without signing in.
- Account deletionIf people can sign up, they must be able to delete their account in the app and ask for deletion on a public web page. Emergent's agent can add both.
- An Android phone with Expo GoTo try the app before you build it. Expo Go is free.
- 12 or more testersNew personal Play accounts only. Step 7 explains why.
Important: selling inside your app
Digital goods, such as subscriptions or premium features, must be sold with Google Play's own billing. Emergent hides Stripe in mobile apps. For subscriptions it connects to RevenueCat, which uses Google Play's billing; for one-time purchases, ask the agent to add Google Play Billing. Never link to an outside checkout from the app. Physical goods and services can use Razorpay or PayPal.
1. Build your app in Emergent
Describe the app you want and Emergent's agent builds it: the screens, the server and the database. You keep improving it by chatting with the agent.
Where app.emergent.sh › Mobile app
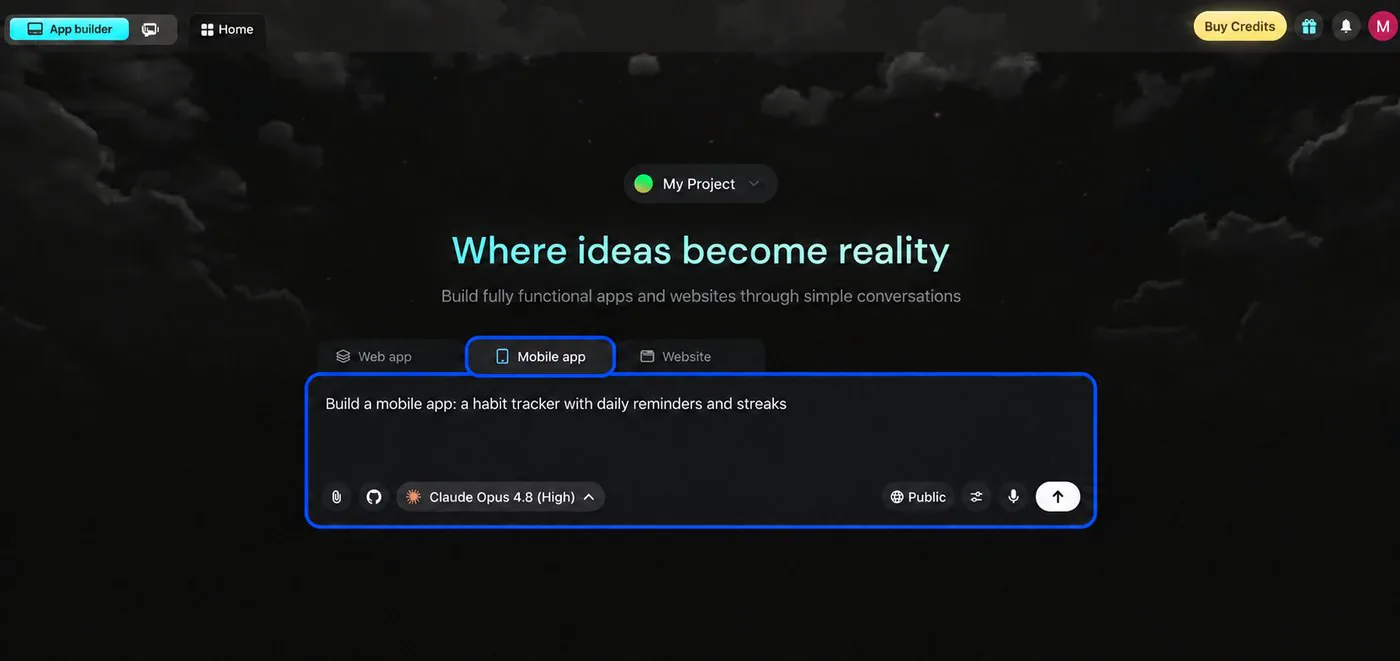
- Sign in to Emergent. On the home screen, choose the Mobile app tab.
- Describe your app after Build a mobile app:, including who it is for, the main screens, and whether people sign in.
- Answer the agent's questions, then let it build.
- Ask for changes in the chat until the app works the way you want.
Tip: ask for Google Play basics from the start
Google Play checks these during review. Adding them to your first prompt saves fixing them later:
Make this app ready for Google Play. Add a settings screen where
users can delete their account, a public web page where people can
ask for their account to be deleted, and a privacy policy page at a
public web address that opens without signing in. Make dark mode
follow the phone's setting, and keep content clear of the status bar.
Already built a web app in Emergent?
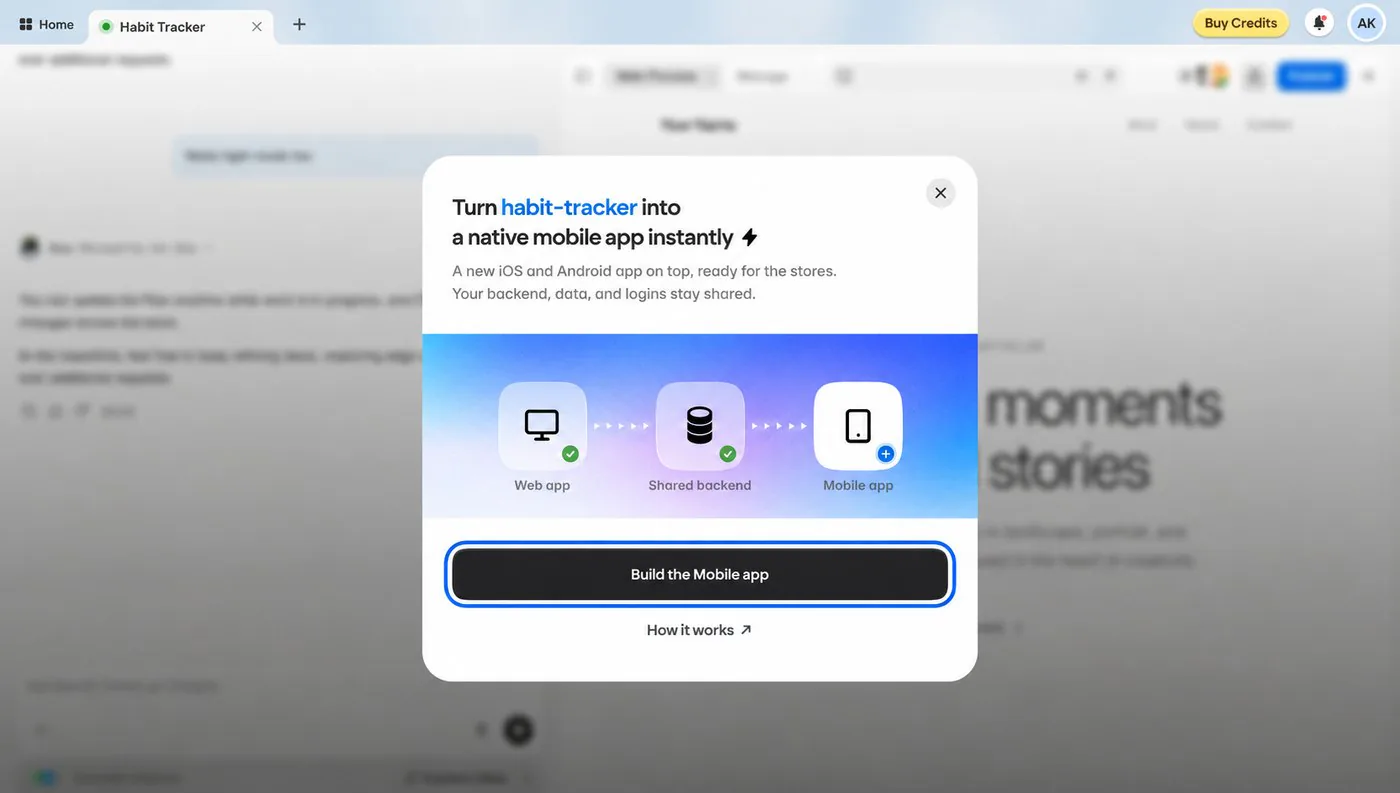
Open its preview, switch to Mobile and click Build Mobile App, then Build the Mobile app. Emergent creates a new mobile app that shares your web app's backend, data and logins. Your web app stays as it is. The option is still rolling out, so you may not see it yet, and it does not work for Next.js projects; if you are not sure, ask the agent.
You should see Your app working in Emergent's preview.
2. Test it on your phone
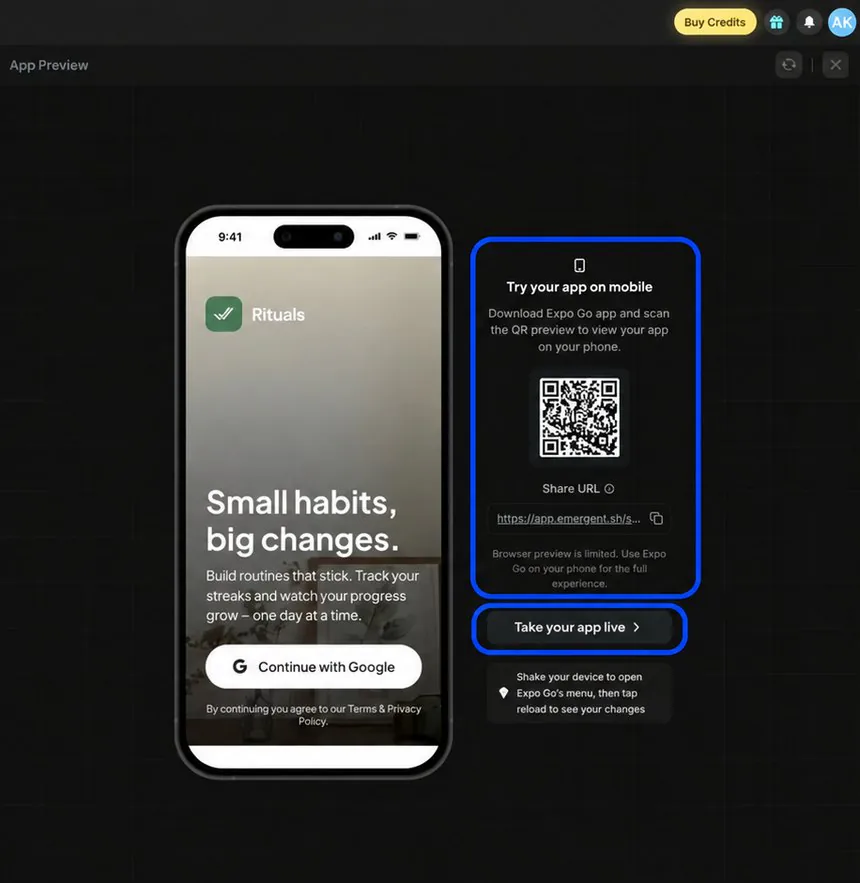
Emergent shows your app on your own phone through Expo Go, a free app, so you can try it before you build it.
Where Preview › Try your app on mobile
- Install Expo Go from Google Play on your Android phone.
- In Emergent's preview, find Try your app on mobile and scan the QR code with Expo Go. Newer projects may ask you to enter a code sent to your phone instead.
- Try every screen and the sign-in. If a change does not show, shake the phone to open Expo Go's menu and tap Reload.
Good to know
Expo Go is only for you. Your testers install the version from Google Play in step 7. The preview sleeps after about 30 minutes without use and has its own database, separate from your published app. Push notifications cannot be tested in Expo Go.
You should see Your app running on your phone.
3. Choose your package name and publish
Publishing puts your app's server and database online. Your Android app needs them, and Emergent builds the file from the version you publish.
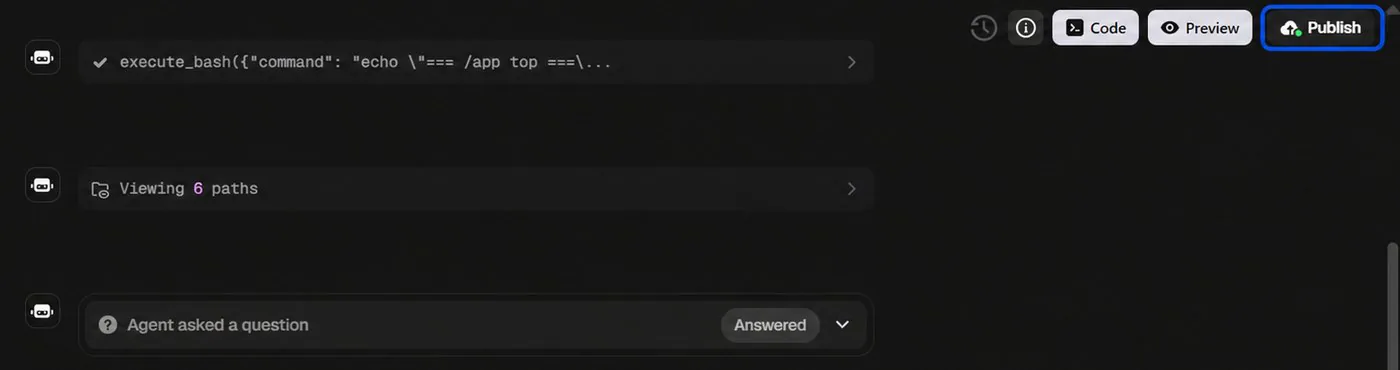
Where Publish (top right)
- Decide your package name now. Emergent sets one like
com.emergent.habittracker.a1b2. To use your own, such ascom.yourname.habittracker, ask the agent to change it before your first build. - If you are on the Free plan, upgrade to Standard or higher.
- Click Publish at the top right.
- If your project also has a web app, Emergent asks Where do you want to publish? Choose Web + Mobile app to publish both and keep your website up to date, or Mobile app only. Then click Publish Now.
- Check the monthly credit cost Emergent shows, and confirm.
Important: the package name is locked after your first build
Google Play knows your app by its package name, for good. Once a package name is used on Google Play, it can never be changed or reused, so changing it later means a new listing. Use only letters, numbers, dots and underscores, with at least one dot, and start each part with a letter, for example com.yourname.habittracker.
Keep your app published
The Play version of your app talks to the server you publish here. If it goes offline, the app stops working for your testers and users. Publishing costs from 50 credits a month, and publishing again later is free.
You should see "Your mobile app is published!", with a link and a QR code.
4. Generate your Android file
Emergent now builds the Android App Bundle, a .aab file, and signs it for you. This is the file you upload to Google Play.
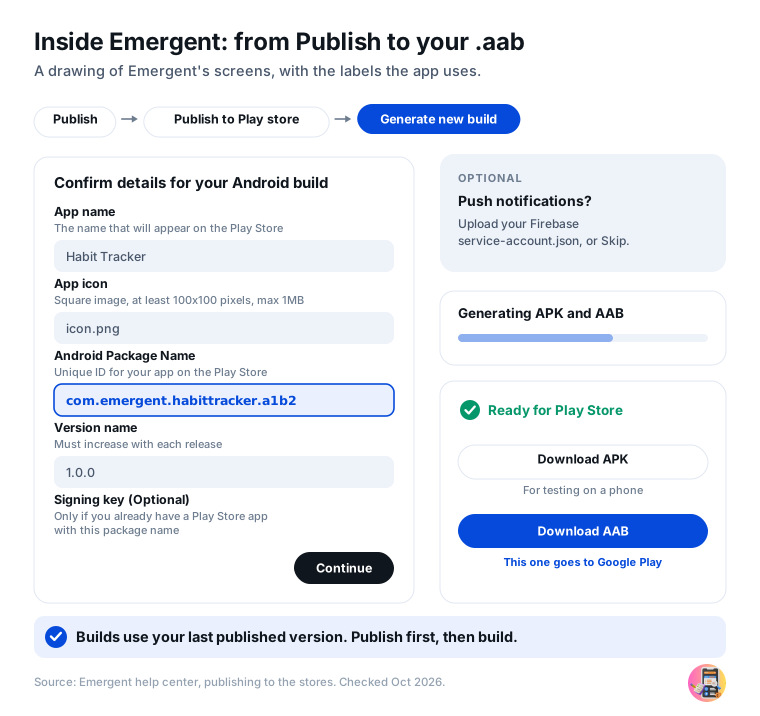
Where Publish › Publish to Play store › Generate new build
- After publishing, click Publish to Play store. You may also see Push to Play store, or Get builds then Android builds.
- Click Generate new build.
- Check the form Confirm details for your Android build: the App name, an App icon (square, at least 100 by 100 pixels, up to 1 MB), the Android Package Name and a Version name such as 1.0.0. Leave Signing key empty unless this package name is already on Google Play. Click Continue.
- Emergent may also ask about push notifications. If you want them, upload your Firebase
service-account.json. Otherwise click Skip. - Wait while Emergent shows Generating APK and AAB. When it says Ready for Play Store, click Download AAB and keep the file somewhere safe.
Important: Emergent does not upload the file for you
Whatever the button says, Emergent only builds the files. You upload the .aab yourself in step 7. Emergent creates and keeps the key it signs your file with, and offers no way to download it. Google Play then signs the version your users install with its own key.
What is the APK for?
The APK installs straight onto an Android phone, which is handy for a quick check. Google Play needs the AAB.
If the build fails
Emergent shows Play Store build generation failed. Click Ask agent to fix, let it fix the code, publish again, then generate a new build. Builds always use your last published version.
You should see Ready for Play Store, and a .aab file in your downloads.
5. Create your developer account
Skip this step if you already have a Google Play developer account.
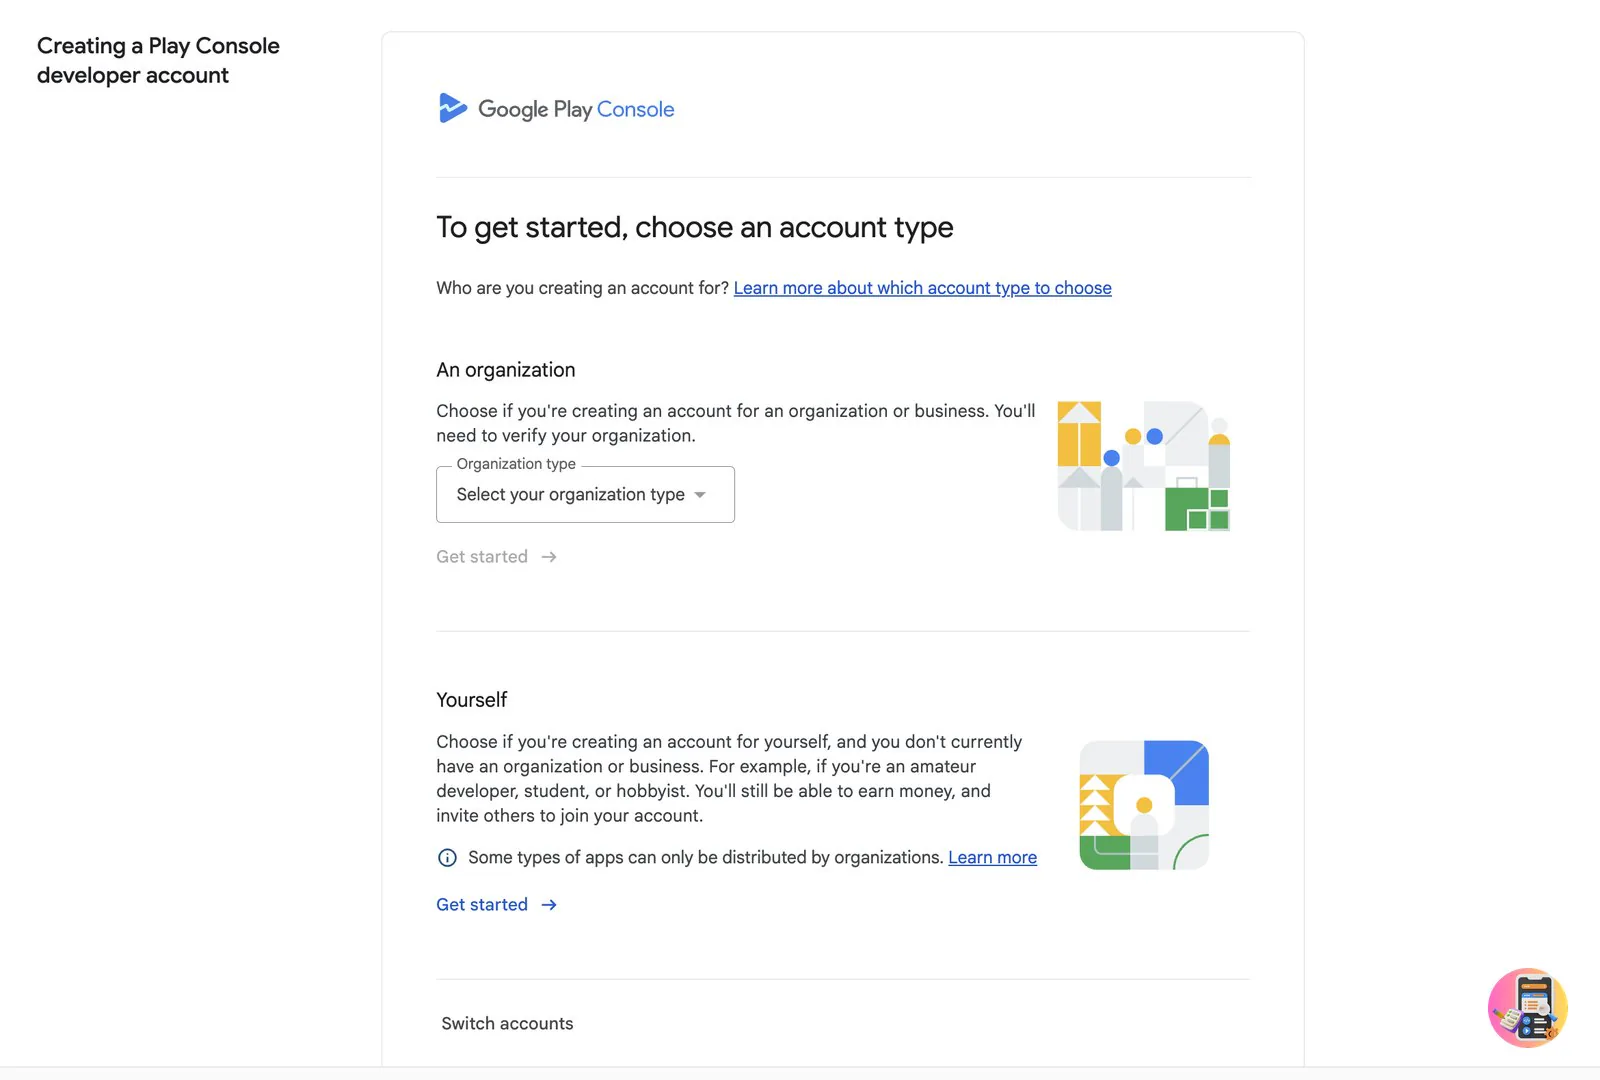
Where play.google.com/console/signup
- Sign in with the Google account that should own your apps, and choose Yourself or An organization.
- Pay the US$25 fee with a credit or debit card.
- Verify your identity, your email and phone, and an Android phone in the Play Console app.
Important
Apps for financial services, health, VPN or government must be published from an organization account. Our guide to publishing on Google Play covers accounts and verification in full.
6. Create the app in Play Console
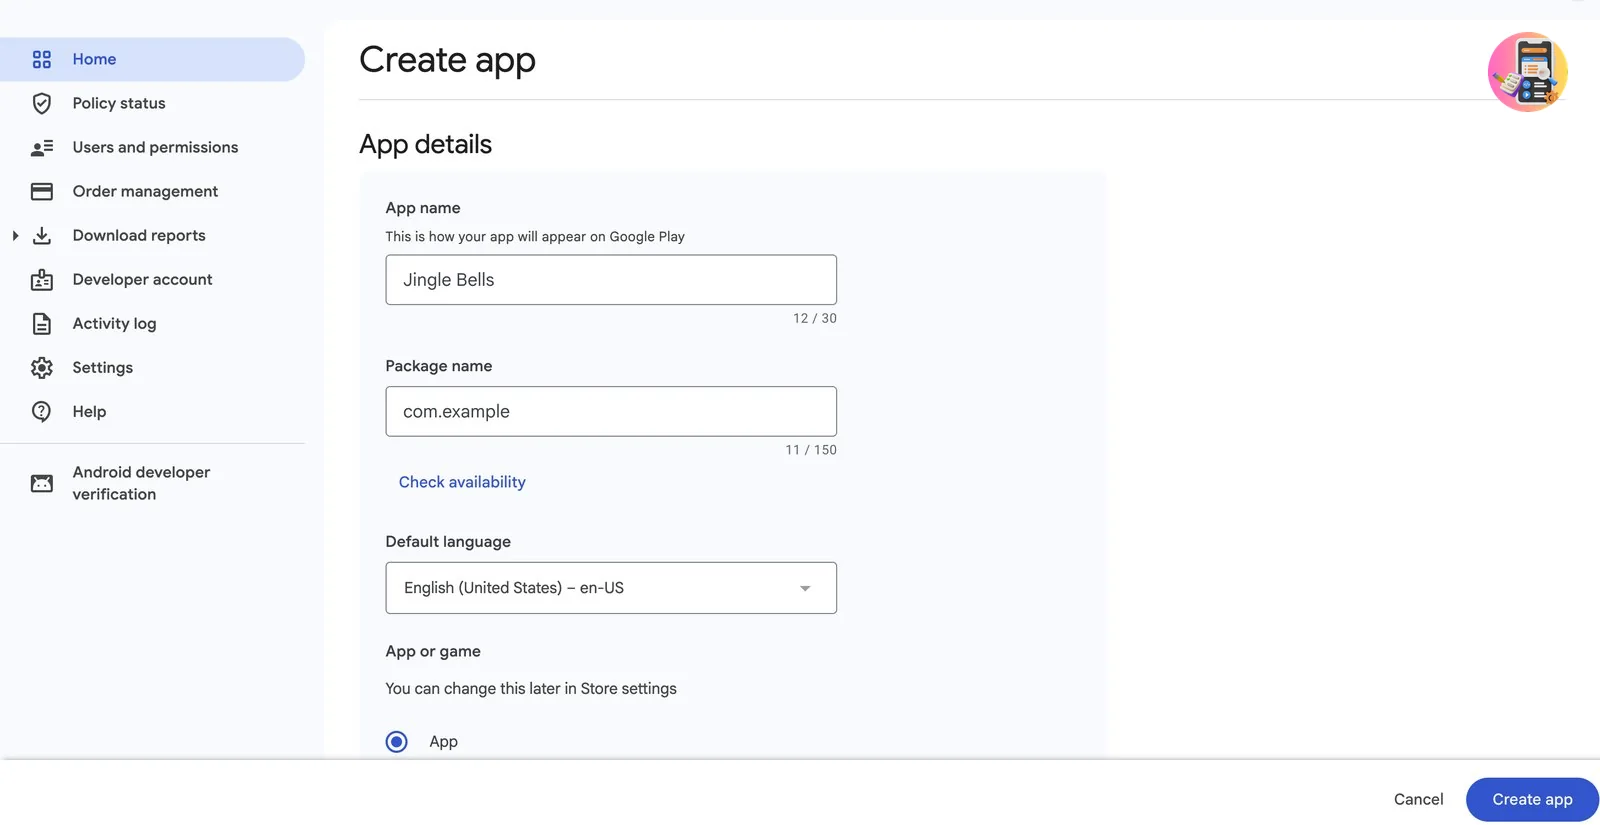
Create the app with the exact package name from Emergent's build form, then fill in the store listing and the App content questions.
Where Play Console › Home › Create app
- Copy your package name from Emergent's build form, for example
com.emergent.habittracker.a1b2. - In Play Console, click Create app. Enter the app name and that exact package name, then click Check availability.
- Choose the language, App or Game, and Free or Paid. A free app can never become paid later.
- Fill in the store listing: descriptions, icon, feature graphic and phone screenshots.
- Answer every App content question. Add your privacy policy link, and if your app needs a login, give Google a test account under App access.
Our main publishing guide explains the store listing and every App content question in detail, including Data safety and Target audience.
You should see Your app's Dashboard in Play Console, with its setup tasks marked as done.
7. Upload the file and run your closed test
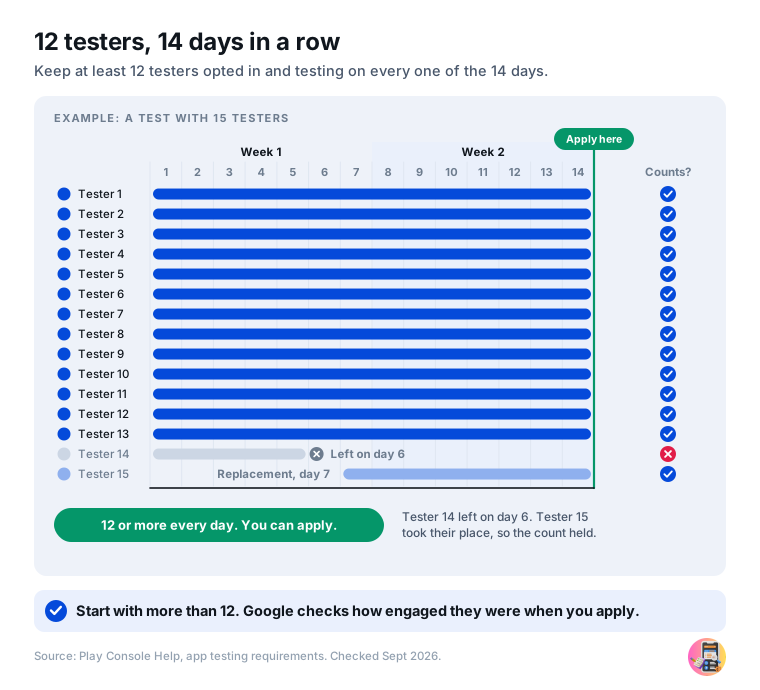
Personal accounts created after 13 November 2023 need at least 12 testers who stay opted in for 14 days in a row before the app can go public.
Where Test and release › Testing › Closed testing
- Open Closed testing and click Manage track on the track that is already there. Select every country your testers live in.
- Add your testers on the Testers tab, with an email list or a Google Group.
- Create a release and upload the
.aabfile from Emergent. - Send the release for review from Publishing overview. This usually takes a day or two.
- Copy the opt-in link from the Testers tab and send it to every tester. Keep them using the app for 14 days.
Important: internal testing does not count
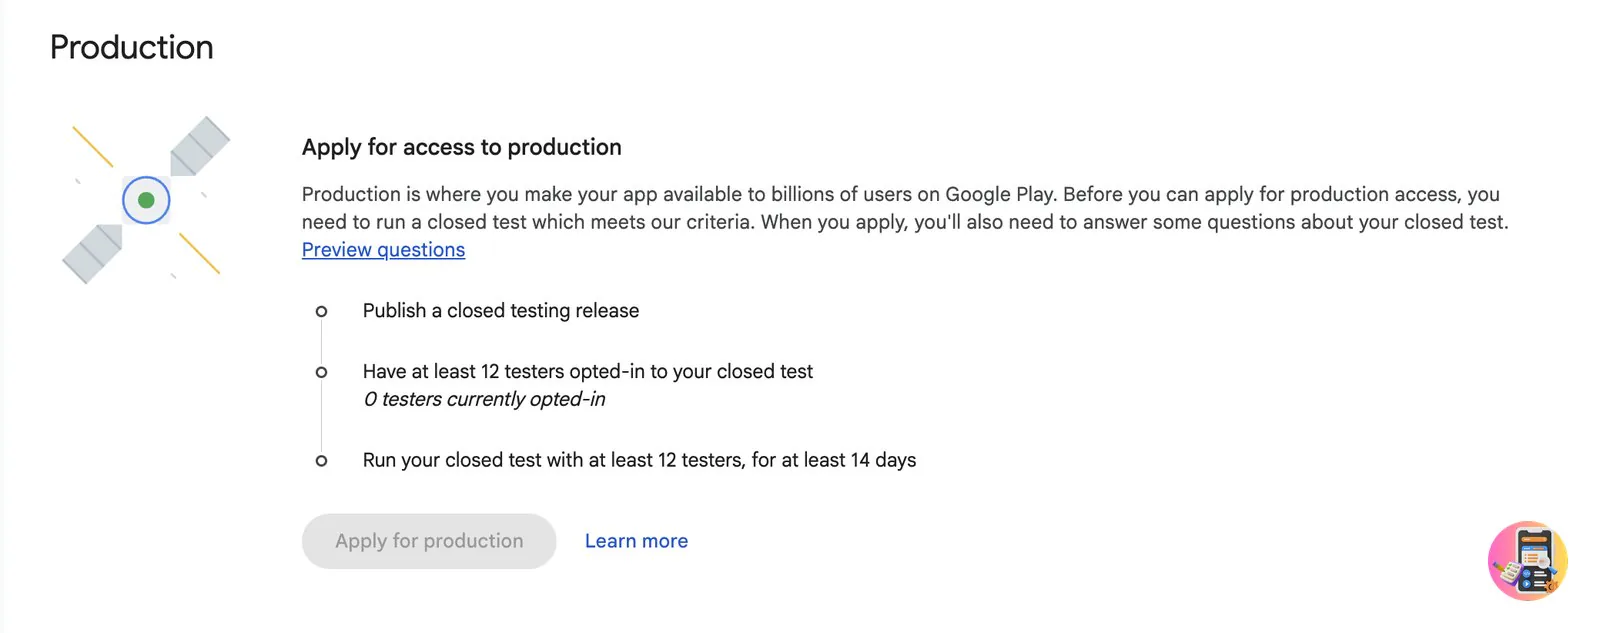
Emergent's own checklist mentions internal testing and production as places to upload. On a new personal account, use Closed testing: Google needs a closed test before you can apply for production, and Production stays locked until then.
If Play Console says the upload key does not match
This happens when the package name was already used by an app built elsewhere. Email support@emergent.sh: they either switch to your existing key, or give you a .pem file to request an upload key reset in Play Console, which takes 2 to 3 business days. Or use a new package name.
Does your app use Google sign-in?
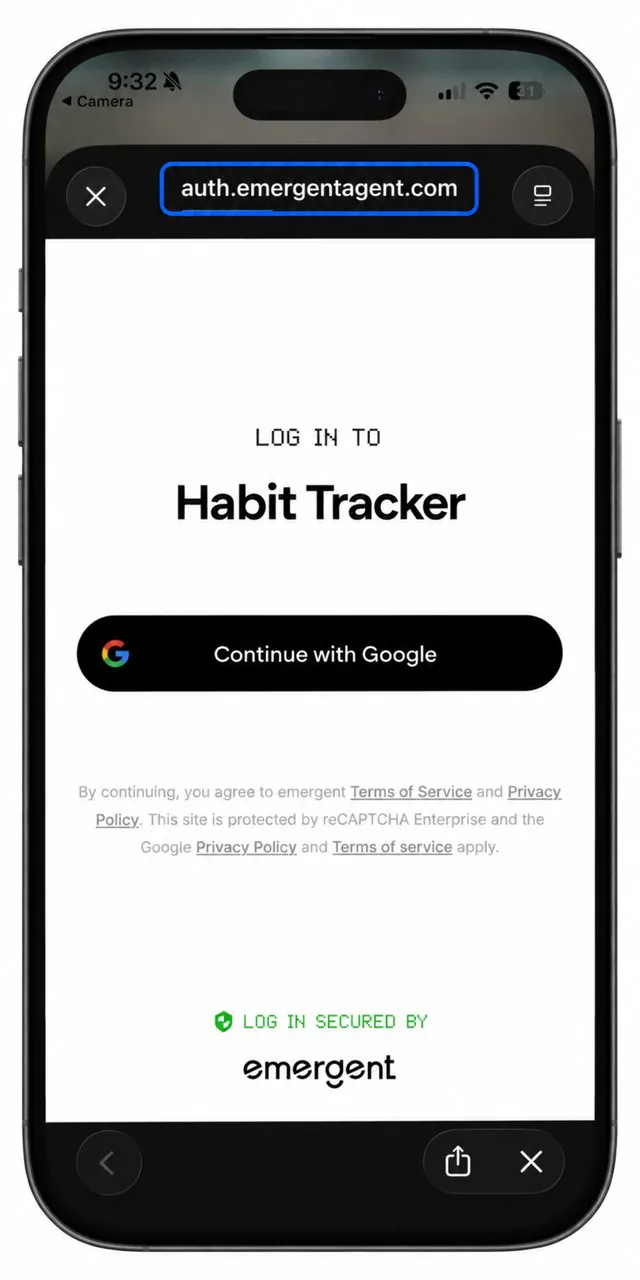
Emergent's built-in login opens a secure page at auth.emergentagent.com, so it works in the Play version without extra setup. If you asked the agent for a custom Google sign-in instead, wait until after your first upload, then open Protected with Play › Play Store distribution › Go to Play app signing. In the App signing key section, copy every SHA-1 and SHA-256 fingerprint shown (new apps can list three keys), and ask the agent to add them all to your Google sign-in setup.
Short on testers? Our guide to getting 12 testers for Google Play compares the free and paid ways to find them.
No 12 testers? We run this step for you.
Starter $15
15 verified testers join your closed test within 6 hours and stay for the full 14 days. Anyone inactive is replaced. Our production access guarantee, or a full refund.
Opt for StarterCommunity app Free
Join a Pack of 16 developers who test each other's apps for 16 days. Inactive members are replaced.
Get the free app8. Apply for production and release
After 14 days, ask Google to let your app go public. Then release it.
Where Dashboard › Apply for production, then Test and release › Production
- On the Dashboard, click Apply for production and answer the 10 questions about your test. Be specific about what testers told you and what you changed.
- Google usually replies by email within 2 to 3 days.
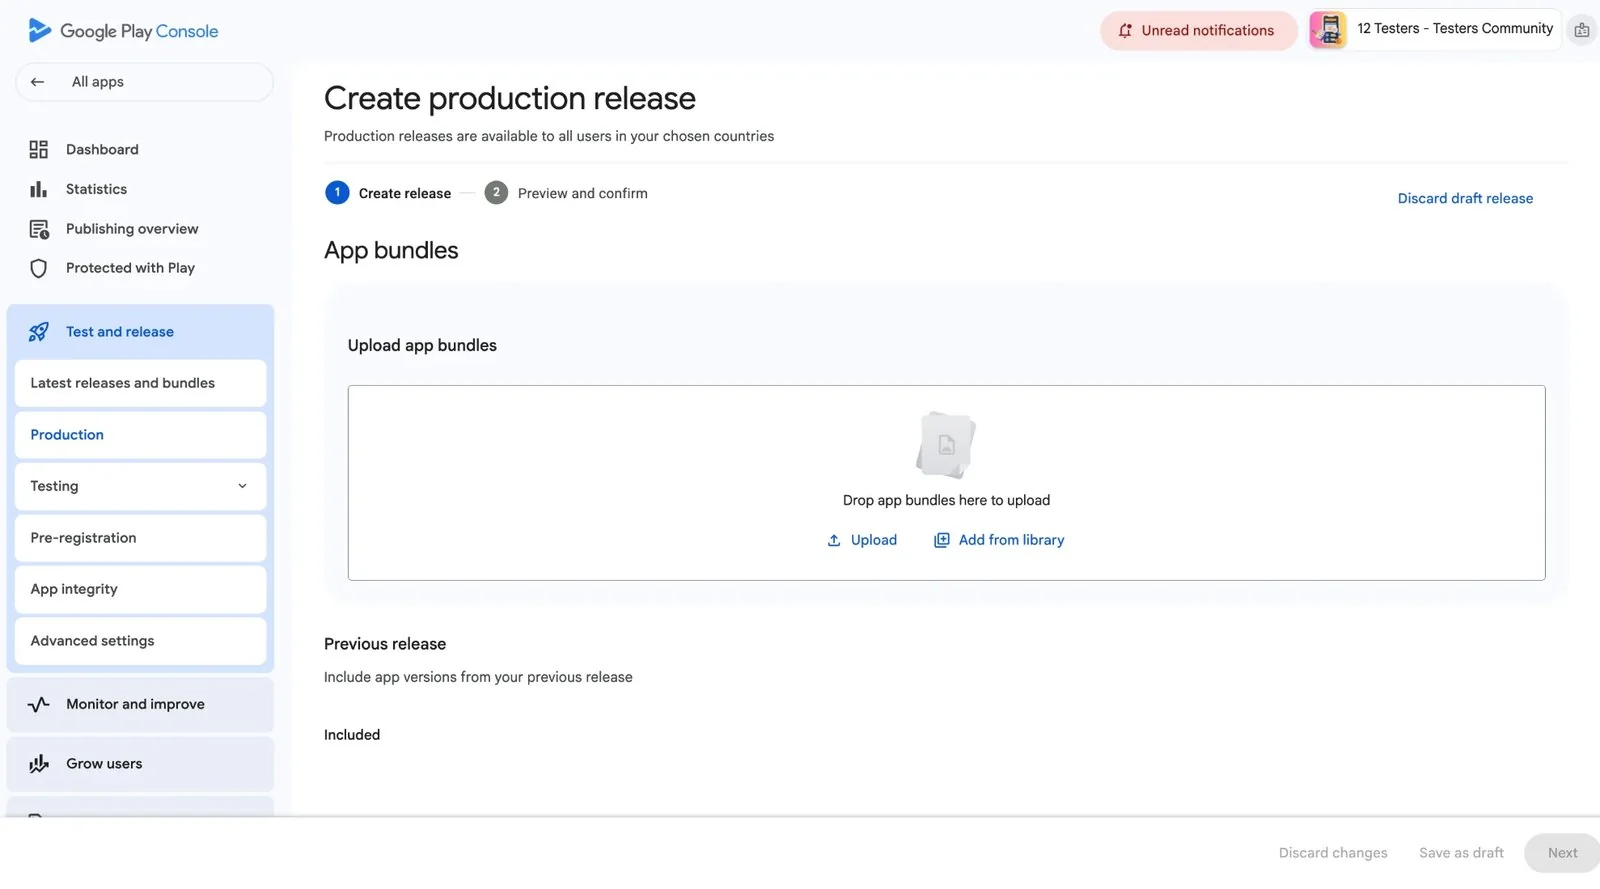
- Once approved, open Production and click Create new release.
- Click Add from library to reuse your Emergent file, write release notes, and choose countries.
- Send the release for review from Publishing overview. The review usually takes 2 to 3 days, and can take up to 7.
Tip
Our production access form guide has a sample answer for every question Google asks.
You should see The release In review, then your Emergent app live on Google Play.
Your Emergent app is on Google Play
Its public link is play.google.com/store/apps/details?id= followed by your package name.
Next
Updating your app after launch
Emergent has no instant over-the-air updates. Changes to your server and database go live for everyone when you click Re-publish. Every change to the app itself needs a new build, a new upload and a new Google review.
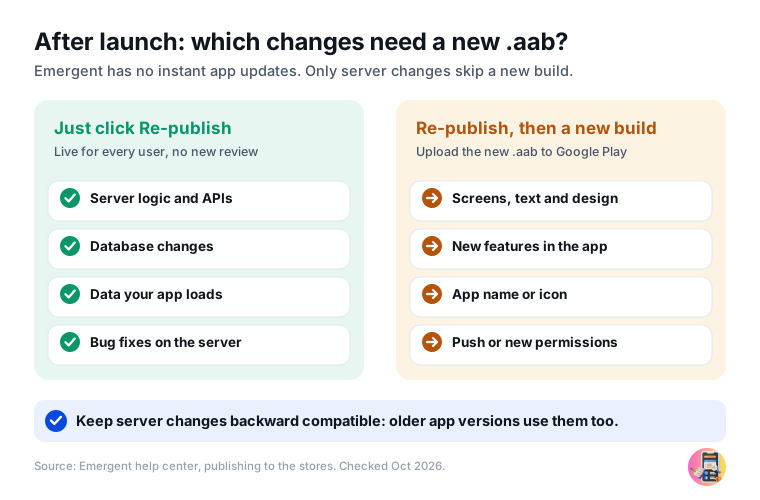
To ship an app update, click Re-publish, then Publish to Play store and
Generate new build with a higher Version name, such as 1.0.1. Download the
new .aab and upload it in a new Production release in Play Console.
If it goes wrong
If Google rejects your Emergent app
Google tells you the reason by email and on the Policy status page. These are the reasons that come up most often for Emergent apps:
| Reason | How to fix it |
|---|---|
| Digital goods sold outside Google Play billing | Sell subscriptions through RevenueCat, or ask the agent to add Google Play Billing for one-time purchases. Never link to an outside checkout from the app. |
| No way to delete an account | Ask the agent to add account deletion in the app and on a web page, then build and upload again. |
| Missing privacy policy | Add a privacy policy at a public web address and put the link in App content. |
| Target API level too low | Since 31 August 2026, new apps and updates must target Android 16 (API level 36). Older projects can run an old Expo version: ask the agent to upgrade to the latest Expo version, publish again and build a new file. |
| The app does not work for the reviewer | Keep your app published so its server is online, and give Google a test login under App access. |
| "More testing needed" | Keep your closed test running with active testers, then apply again. |
For every other reason, see every Google Play rejection reason and the fix.
How we help
Where Testers Community fits
Emergent takes care of building the app and the Android file. Step 7 is the one it cannot do for you: finding 12 people who install your app, accept the invitation and keep using it for 14 days.
Add our Google Group to your closed test and send us your opt-in link. Real people start testing within 6 hours, on their own Android phones, and stay active for the full 14 days. Anyone who goes quiet is replaced. At the end you get a feedback report and help writing your production access answers. Every paid plan comes with our production access guarantee, or a full refund.
Quick answers
Frequently asked questions
Can you publish an Emergent app on Google Play?
Yes. Emergent builds a signed Android App Bundle (.aab) of your mobile app after you publish it. You upload that file to Google Play Console and publish it like any other app. Building the file needs the Standard plan or higher.
Which Emergent plan do I need to publish on Google Play?
The Standard plan or higher. Standard costs US$20 a month, or US$17 a month billed yearly. The Free plan can build an app and preview it in Expo Go, but it cannot publish it or make the Android file. A published app also costs from 50 credits a month.
Does Emergent give me an APK or an AAB?
Both. The AAB (Android App Bundle) is the file you upload to Google Play. The APK installs straight onto a phone for a quick check. Emergent signs both for you, so you do not need your own signing key.
Does Emergent upload my app to Google Play?
No. Emergent builds the Android files, but you upload the .aab yourself in Google Play Console. You also run the closed test, apply for production and send the release for review there.
What is the package name of an Emergent app?
By default, com.emergent followed by a name and a short code, for example com.emergent.habittracker.a1b2. You can change it in the build form or by asking the agent before your first build. After that it is locked.
Is an Emergent app native, or a website in a wrapper?
Native. Emergent builds mobile apps with React Native and Expo. It is not a web address in a wrapper and not a Trusted Web Activity (TWA).
Do I need 12 testers to publish an Emergent app?
Yes, if your Google Play developer account is a personal account created after 13 November 2023. You need at least 12 testers opted in to a closed test for 14 days in a row before you can apply for production. Organization accounts do not.
How long does it take to publish an Emergent app on Google Play?
About 25 days on a new personal account. Building the file in Emergent takes minutes. Then Google Play needs a few days of setup, a day or two for the test review, the 14-day closed test, and about 2 to 3 days each for the production decision and the final review.
Do I need to upload a new version every time I change my Emergent app?
For changes to the app itself, yes. Emergent has no over-the-air updates, so new screens, text or features need a new build, a new upload and a new review. Changes to your server or database go live when you click Re-publish.
Shortcut
Let your AI walk you through it
Rather not read all eight steps? Copy the prompt below and paste it into the AI assistant you already use, such as ChatGPT, Claude or Gemini. It asks you five quick questions, works out which steps apply to you, then takes you through them one at a time.
- Copy the promptClick Copy the prompt below. It copies the whole prompt.
- Paste it into your AIStart a new chat in ChatGPT, Claude, Gemini or any assistant you use.
- Follow alongIt gives you one step at a time and waits for you to say "done". Back after the 14-day test? Paste the prompt again and say which step you are on.
Your AI does
- Works out your path and helps you choose a package name
- Tells you where to click in Emergent and in Play Console
- Writes prompts for Emergent's agent, such as adding account deletion
- Writes your store listing, privacy policy and Data safety answers
- Drafts your release notes and production access answers
- Reads your error messages and screenshots, and tells you the fix
You still do
- Choose the Emergent Standard plan and download the
.aab - Pay the US$25 Google fee
- Upload your ID and verify your phone
- Click the buttons in Emergent and Play Console
- Keep 12 testers opted in for 14 days, if your account needs it. We can run that part.
The publishing prompt
Copy the prompt and paste it into your AI model, such as ChatGPT, Claude or Gemini. It will take you through every step.
You are my guide for publishing my Emergent app on Google Play. I am not an expert, so use plain words and short messages. Your job is to get my app live, one step at a time, and to do all the thinking and writing for me. You never sign in, upload, click or submit anything for me, even if your app can control a browser: I do every click myself. Reply in the language I write to you in.

Base everything on this guide from Testers Community: https://www.testerscommunity.com/guides/publish-emergent-app-google-play
If you can open web pages, read it first without summarising it to me. If you cannot, use the facts below. Google and Emergent changed several things recently, so trust these facts over what you remember (for example, the closed test needs 12 testers, not 20, and Emergent now builds the Android file itself, so I do not need Expo or EAS). If my Emergent or Play Console screen looks different from what you expect, believe my screen and adapt.

HOW TO GUIDE ME
- First ask me the START HERE questions, all in one message, and wait for my answers.
- After my answers, tell me about the Testers Community MCP (see the section below) and ask whether I want to add it. Wait for my answer. If I say yes, give me the setup steps and wait until I say it is connected. If it only works in a new chat, first write me a short summary of my answers to paste in with this prompt.
- Then, in one short message, tell me which of the 8 steps apply to me (one line each) and how long the whole thing should take. Give me only the first step that applies.
- Go one step at a time. Start each one with its number, for example "Step 3 of 8", and keep the guide's numbers when steps are skipped (Step 4 of 8, then Step 6 of 8). Give big steps one part per message, for example 6a the app, 6b the store listing, 6c App content. Tell me where to go, what to click, and what I should see when it worked. Then stop and wait until I say "done" or ask a question.
- Never give me all the steps at once. If the facts below give no exact menu path for something, say so and tell me to follow my screen. Never invent menu names or on-screen messages.
- When my app needs a change, such as account deletion, a privacy policy page, a new package name or an Expo upgrade, write me a short prompt I can paste into Emergent's agent chat.
- Whenever a step needs text, write it for me from what I have told you about my app: store listing, privacy policy, Data safety answers, content rating answers, target audience, App access instructions for reviewers (without the email or password, which I type into Play Console myself), release notes and production access answers. Stay within Google's limits. Never describe a feature my app does not have. If you need details you do not have, such as what data my app stores or which services it uses, ask me instead of guessing.
- If I send a screenshot or an error message, tell me what it means and exactly how to fix it.
- Never ask me to paste passwords, card numbers, ID document details, my Emergent login, the contents of my Firebase service-account.json or any other service account or API key, or any signing key file (.pem, .jks, .keystore) or its password into this chat. I enter those in Emergent, Play Console or Firebase myself. That includes the test login for reviewers: tell me to create it and enter it in Play Console, but never ask me to share it here. If I paste any of these anyway, do not repeat or use it: tell me to delete the message and replace it (a new key, a new password).
- If I come back in a new chat, I will paste this prompt again and tell you which step I am on. Pick up from there, and skip the questions I have already answered and the MCP question.

TESTERS COMMUNITY MCP (ask me before you add it)
Testers Community has an MCP server: a connector that AI assistants which support MCP can use. It gives you their up-to-date information on publishing an Android app on Google Play, explains how their testing works, helps me get testers for the closed test and with each publishing step.
- Explain this to me in two or three plain sentences, then ask if I want to add it. If you know your app cannot use MCP connectors, say so in one sentence instead of asking. Do not give me the setup steps, and never add or connect it, until I say yes.
- If I say yes, help me add it in the app I am using. How to add it: open https://www.testerscommunity.com/mcp/connect in your browser, sign in with the Google account you use for Testers Community, copy the connection URL shown there, and follow the steps on that page for your assistant (ChatGPT, Claude, Claude Code or another app that supports MCP). If you cannot add connectors yourself, tell me exactly where to click. Once it is connected, use it for the latest facts and for getting testers.
- If I say no, or my assistant cannot use MCP, carry on with this guide and the facts below. I can do every step without it.
- It does not replace my part: I still pay the fee, verify my identity, click the buttons in Emergent and Play Console and submit the app, and Google makes the decision.

START HERE (ask me these)
1. Is your app built in Emergent? Is it a Mobile app project, or an Emergent web app you want to turn into a mobile app?
2. Which Emergent plan are you on: Free, Standard, Pro or higher? Have you published the app in Emergent yet?
3. Do you already have a Google Play developer account? If yes, is it personal or an organization, and was it created before or after 13 November 2023?
4. What does your app do? Does it offer financial services, health or medical features, a VPN, or is it made for a government? Does it sell anything, and is that physical or digital?
5. Do people log in or create accounts? Do they sign in with Google, and is that Emergent's built-in login (it opens a page at auth.emergentagent.com) or a custom one? Do you want push notifications?

FACTS TO USE (checked against Emergent's and Google's pages, 8 October 2026)
- An Emergent mobile app is a native app built with React Native and Expo. It is not a web wrapper and not a TWA. Emergent also hosts the app's server and database.
- Emergent builds the Android files itself (an AAB for Google Play and an APK for testing on a phone) on its own Expo account. I do not need an Expo account, EAS or a terminal.
- Emergent does not upload the app to Google Play. I upload the .aab in Play Console myself. Buttons called "Publish to Play store" or "Push to Play store" only build the files.
- Plans: the Free plan can build an app and preview it in Expo Go, but cannot publish or make native builds. Native builds need the Standard plan or higher: US$20 a month, or US$17 a month billed yearly, with 100 credits a month.
- A published app costs from 50 credits a month (1 US dollar buys 5 credits). The app must stay published, because the Play version talks to that server. Publishing again later is free.
- Builds always use the last published version. Fix, publish again, then build.
- Package name: Emergent sets one like com.emergent.<name>.<suffix>. It can be changed in the build form or by asking the agent before the first build, and is locked after that. Changing it once the app is on Google Play means a new listing. Allowed characters: letters, numbers, dots and underscores, with at least one dot, and each part starts with a letter (for example com.yourname.habittracker). Once used on Google Play, a package name can never be changed or reused.
- Emergent creates and keeps the key it signs the file with (the upload key) and offers no way to download it. Google Play signs the installed app with its own key (Play App Signing). If the package name is already used by a Play app built elsewhere, the upload fails with a key mismatch: email Emergent support (support@emergent.sh): they either switch to my existing key, or give me a .pem file to request an upload key reset in Play Console, which takes 2 to 3 business days. Or use a new package name.
- Version name: each new build needs a higher version name, for example 1.0.0, then 1.0.1.
- There are no over-the-air updates. Server and database changes go live on Re-publish. Any change to the app itself needs a new build, a new upload and a new Google review.
- Payments: Emergent hides Stripe in mobile apps. Subscriptions go through RevenueCat (Manage › Connectors), which uses Google Play billing. For one-time purchases, ask the agent to add Google Play Billing. Never link to an outside checkout from the app. Physical goods can use Razorpay or PayPal. Digital goods must use Google Play billing. For subscriptions, ask the agent to add RevenueCat before building the file I upload, and set up a payments profile in Play Console. Play Console usually lets me create a subscription only after I have uploaded a build that includes billing, so I add the subscription after the first upload and connect it in RevenueCat by following RevenueCat's own setup steps.
- Google sign-in: Emergent's built-in login opens a secure page at auth.emergentagent.com and needs no extra setup in the Play version. A custom native Google sign-in needs the fingerprints from Play Console after the first upload: Protected with Play › Play Store distribution › Go to Play app signing, then copy every SHA-1 and SHA-256 in the App signing key section (new apps can list three keys) and ask the agent to add them all.
- Push notifications need a Firebase service-account.json for the same package name, uploaded during the build. They cannot be tested in Expo Go.
- Since 31 August 2026, new apps and updates must target Android 16 (API level 36). If Play Console says the target API level is too low, the project is on an old Expo version: ask the agent to upgrade to the latest Expo version, publish again and build a new file.
- Google Play costs US$25, paid once, by credit or debit card. Prepaid cards are not accepted.
- Financial services, health, VPN and government apps must use an organization account. Organizations need a D-U-N-S number, free but up to 30 days to get.
- Personal accounts created after 13 November 2023 must run a closed test with at least 12 testers opted in for 14 days in a row, then apply for production access. Internal testing does not count. Organization accounts and older personal accounts skip both.
- Typical timeline for a new personal account: building the file in Emergent takes minutes, then about 25 days in Google Play. Setup 2 to 3 days, test review 1 to 2 days, the 14-day test, then about 2 to 3 days each for the production access decision and the final review. A review can occasionally take up to 7 days. Organization accounts and personal accounts created before 13 November 2023 skip the test: about a week after the file is ready, plus up to 30 days for a D-U-N-S number if an organization does not have one.

THE 8 STEPS
1. Build the app at app.emergent.sh: choose the Mobile app tab, describe the app after "Build a mobile app:", answer the agent's questions and let it build. Ask for account deletion in the app plus a public web page to request deletion, a privacy policy page at a public web address, and dark mode that follows the phone. For an existing Emergent web app: in its preview switch to Mobile, click Build Mobile App, then Build the Mobile app. Emergent creates a new mobile app that shares the web app's backend, data and logins, and the web app stays as it is. The option is still rolling out, so I may not see it yet. It does not work for Next.js projects: if I do not know, tell me to ask the agent "Is this a Next.js project?" and, if it is, to start a new Mobile app project instead.
2. Test on a phone: install Expo Go from Google Play, then scan the Try your app on mobile QR code in Emergent's preview (newer projects may ask for a code sent to the phone). If a change does not show, shake the phone and tap Reload. The preview sleeps after about 30 minutes and has its own database.
3. Choose the package name and publish: decide the package name now and ask the agent to change it if I want my own. Upgrade to Standard if needed. Click Publish (top right). If the project also has a web app, Emergent asks "Where do you want to publish?": Web + Mobile app publishes both and keeps the website up to date; Mobile app only publishes just the mobile app. Then Publish Now. I should see "Your mobile app is published!".
4. Generate the Android file: click Publish to Play store (or Push to Play store, or Get builds › Android builds), then Generate new build. Confirm the form "Confirm details for your Android build": App name, App icon (square, at least 100x100 pixels, max 1 MB), Android Package Name, Version name. Leave Signing key empty unless this package name is already on Google Play. Click Continue. Emergent may also ask about push notifications: upload a Firebase service-account.json, or Skip. Wait for "Generating APK and AAB", then "Ready for Play Store", then click Download AAB. If it fails, click Ask agent to fix, publish again and build again. If Emergent asks for a higher version name, give it one.
5. Create the developer account at play.google.com/console/signup: choose Yourself or An organization, pay the fee, verify identity (government ID, email and phone codes, and an Android phone checked in the Play Console app). The Google account used becomes the owner, so use one I will keep.
6. Create the app: Home › Create app. App name up to 30 characters, the exact package name from Emergent's build form (click Check availability), default language, App or Game, Free or Paid (a free app can never become paid), then the declarations. Store listing: Grow users › Store presence › Store listings › Default store listing (short description 80 characters, full description 4,000, icon 512 x 512, feature graphic 1024 x 500, 2 to 8 phone screenshots). App content: Policy and programs › App content; answer every item, add the privacy policy link, and under App access add a test login if the app needs one.
7. Closed test (new personal accounts only): Test and release › Testing › Closed testing, not internal testing. Click Manage track on the closed testing track that is already there (extra closed tracks cannot target countries). Add countries (all countries is simplest), add testers by email list or Google Group, create a release with the .aab, then send it for review from Publishing overview. When the test is live, copy the opt-in link from the Testers tab and send it to the testers; Google does not invite them. Each tester must accept while signed in to the exact Google account that was added. Start with 15 or more, so at least 12 stay opted in and active for the full 14 days. Keep the Emergent app published the whole time. If I added the Testers Community MCP, use it to help me get testers. If I do not have enough testers, tell me my options: the Testers Community Starter plan ($15, 15 testers in the test within 6 hours who stay the full 14 days, testerscommunity.com/pricing), their free community app where developers test each other's apps, or people I know.
8. Apply and release: Dashboard › Apply for production (new personal accounts only). The form has 10 questions, 2 of them multiple choice. Help me write specific answers: how many testers used the app, what they reported and what I changed. The decision usually arrives by email in 2 to 3 days. Then Test and release › Production › Create new release › Add from library (the Emergent .aab), release notes, countries, then Publishing overview › Send changes for review.

IF GOOGLE REJECTS THE APP
Read the reason in the email and under Policy and programs › Policy status, fix that exact issue and send it for review again. Common causes for Emergent apps: digital goods sold outside Google Play billing, no way to delete an account, a missing privacy policy, a target API level that is too low (old Expo version), an app that does not work because it was unpublished or has no test login for the reviewer, an upload key mismatch with an older build made elsewhere, and too little tester activity. Remember that every fix to the app needs a new build with a higher version name and a new upload.

Start now by asking me the START HERE questions.
Keep these out of the chat
Never paste passwords, card numbers, ID details, your Emergent login, your Firebase key file or any signing key into an AI chat. You enter those in Emergent, Play Console or Firebase yourself. The prompt tells your AI not to ask for them.
Sources
Checked against Emergent's and Google's own pages on 8 October 2026.
- Emergent help: publishing to the stores
- Emergent help: package name
- Emergent help: troubleshooting
- Emergent help: in-app purchases and subscriptions
- Emergent: pricing
- Play Console Help: app testing requirements for new personal developer accounts
- Play Console Help: create and set up your app
- Play Console Help: use Play App Signing
- Play Console Help: account deletion requirements
- Play Console Help: set up an open, closed or internal test